ANDX: Experience Solutions Built with Technology & Design
Experience Specialists giving you the power to inspire your employees, deepen your customer relationships & strengthen the emotional connection to your brand.
ANDX: Experience Solutions Built with Technology & Design
Experience Specialists giving you the power to inspire your employees, deepen your customer relationships & strengthen the emotional connection to your brand.
GETTING STARTED
Overview
KatieXM survey platform allows users to easily build and launch their own research surveys on customer, employee or product experiences. At ANDX, we are committed to supporting you in the success of your research by providing all the tools and expertise you need.
Get started for free with our Base Plan and upgrade to the Professional Plan as your needs grow. You can also contact us about the Enterprise Plan, where ANDX will design and manage your research end to end.
Browser Compatibility
ANDX aims to deliver high quality services that are secure and functional. To ensure users receive the greatest experience, it is recommended the most up-to-date versions Google Chrome or Mozilla Firefox browsers are used.
Policies
For the most up to date information, visit ANDX’s policy pages:
Account Creation and Login
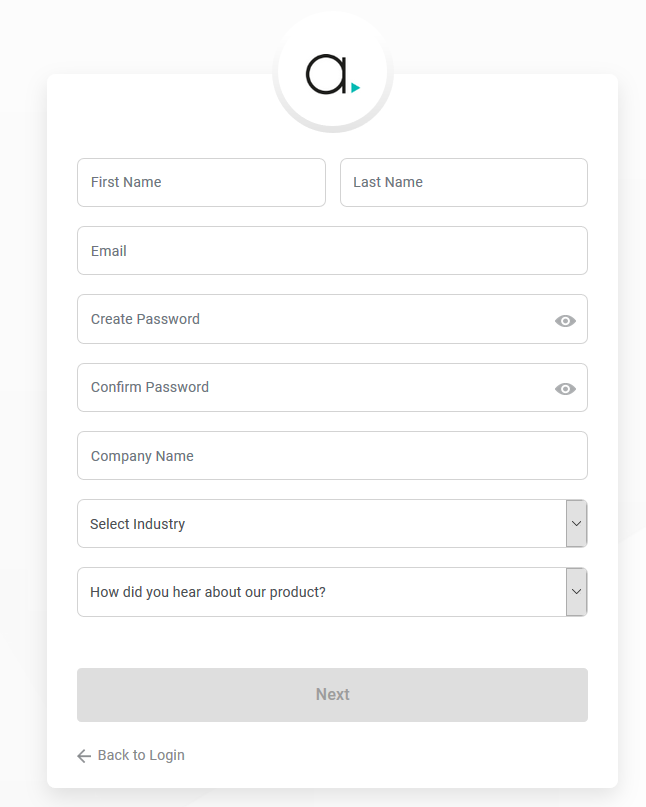
Create an Account Creating an account to design and build your own surveys are free with KatieXM. You can sign-up for free by clicking the link at the bottom of the Login (https://portal.andsurvey.com/login) page or from the Sign-Up (https://portal.andsurvey.com/signUp) page.
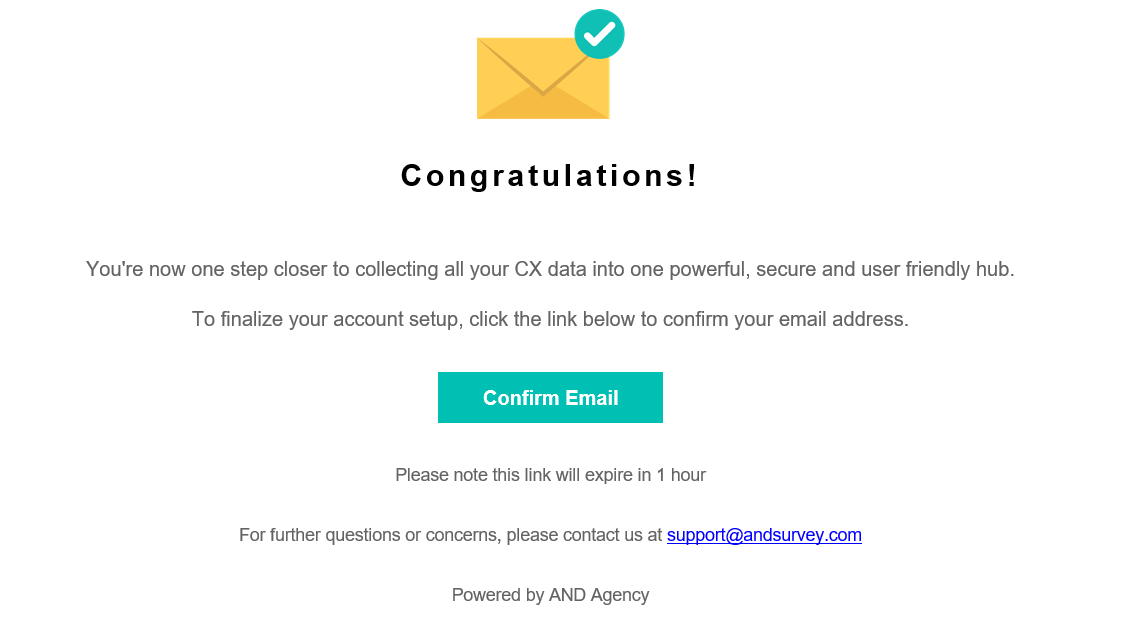
Once you have submitted your credentials, you will receive a confirmation email from noreply@andsurvey.com prompting you to confirm your email address. This email will expire in one hour from receipt.
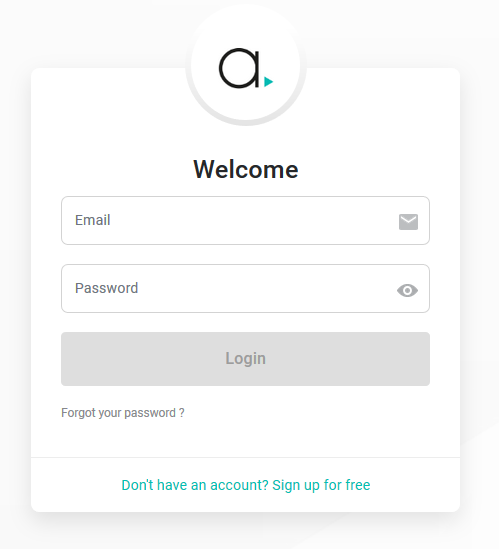
Once you have confirmed your email address, you will be able to access KatieXM’s Survey Authoring by logging in from the main Login page.
Plan Types
To see more on the features available for each, please visit our Compare Plans (andishere.com/plans) page.
ACCOUNT SETTINGS
General Settings
To see your current account details, visit your Account Settings page.
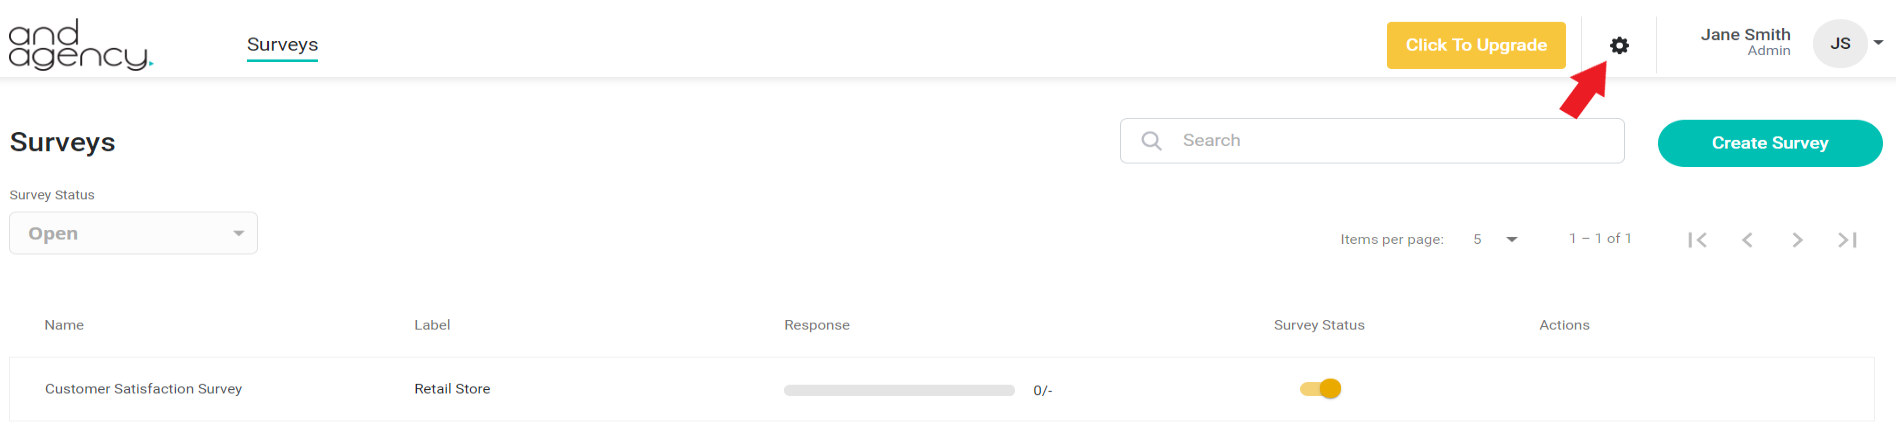
In the General Settings, you can view your Account Details and current Plan, edit your Contact Information and upgrade your plan.
Upgrade Account
Upgrading your account will unlock new features and capabilities. To upgrade your account, select Upgrade from the Account Details page.

After selecting your plan of choice and filling in your personal details, you will be taken to the Secure Checkout page. Complete and review your payment information, once you click Subscribe, you are ready to start using your new features!

Cancel Subscription
To cancel your current subscription, account select Update Billing Details from the Account Details page. On the Payment Details page, select Cancel Subscription.
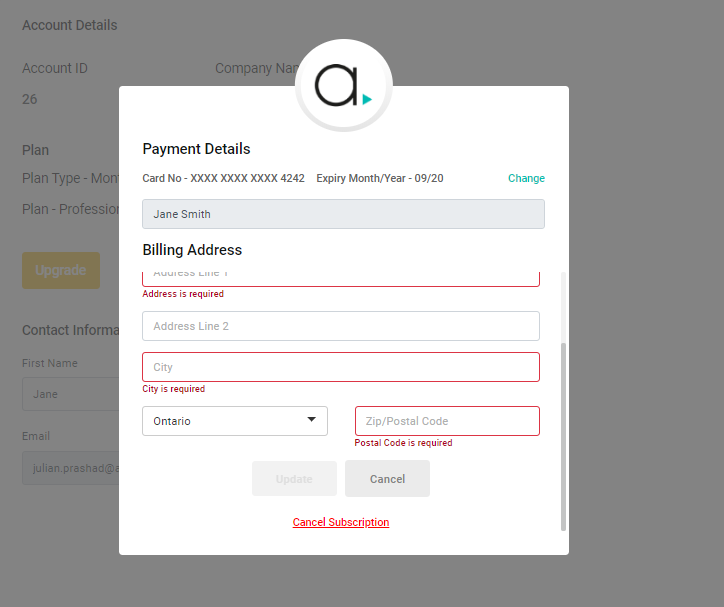
To make changes, such as changing billing cycle from Annual to Monthly, please contact support@andsurvey.com
Once you cancel your subscription, your account will be reverted to the Base Plan. The limitation of the Base Plan will be imposed on your account. Canceling your subscription will impact your account in the following ways:
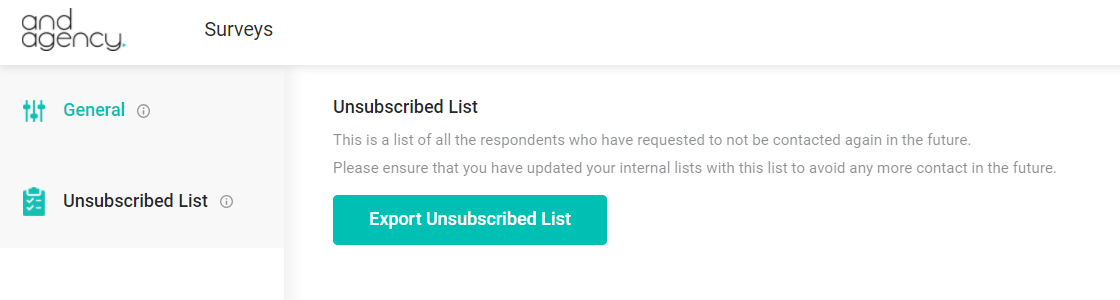
Unsubscribe
A Unsubscribe option is added to the footer all email invites. Respondents have the option to opt-out of receiving further email invites from you.
Users that have unsubscribed can be found when exporting your data. Or, the Unsubscribe List can be exported at the account level found on the Account Settings page.
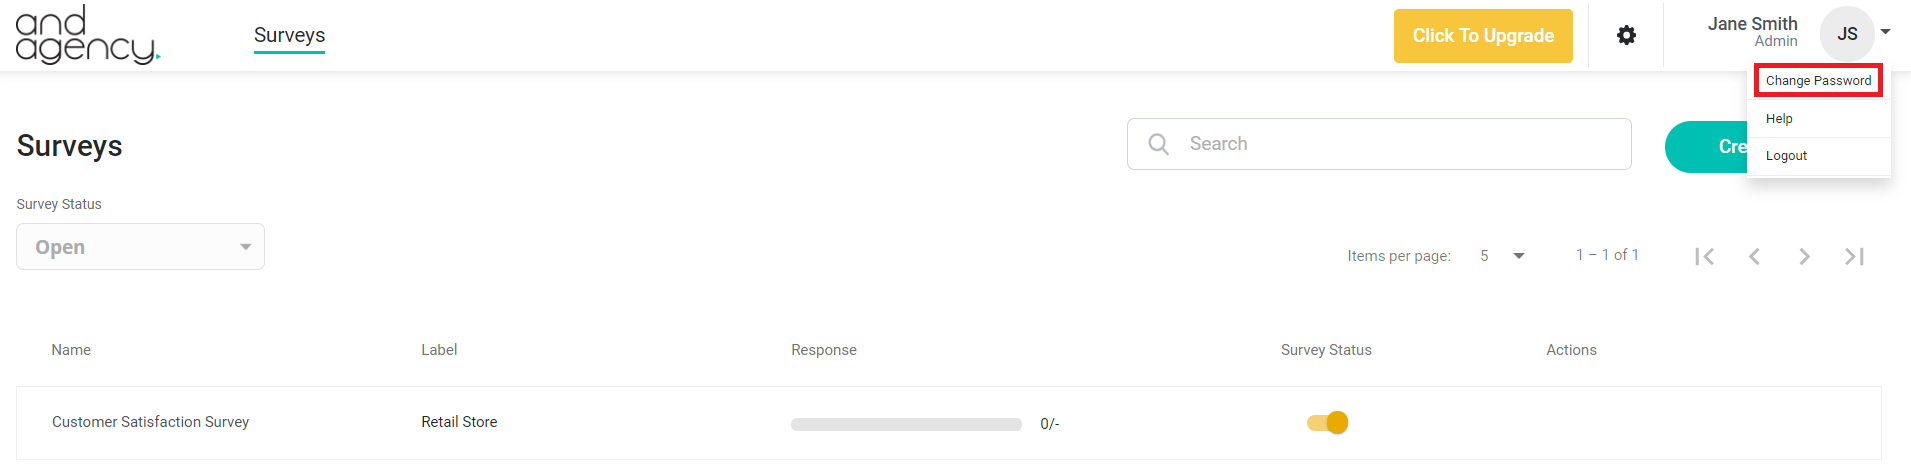
Change Password
You can update your password by selecting the drop-down in the top right-corner and clicking Change Password.
SURVEY LIST
Survey List
The default page once you have logged on is the Surveys page. It provides a listing of all your surveys with series quick actions and information.
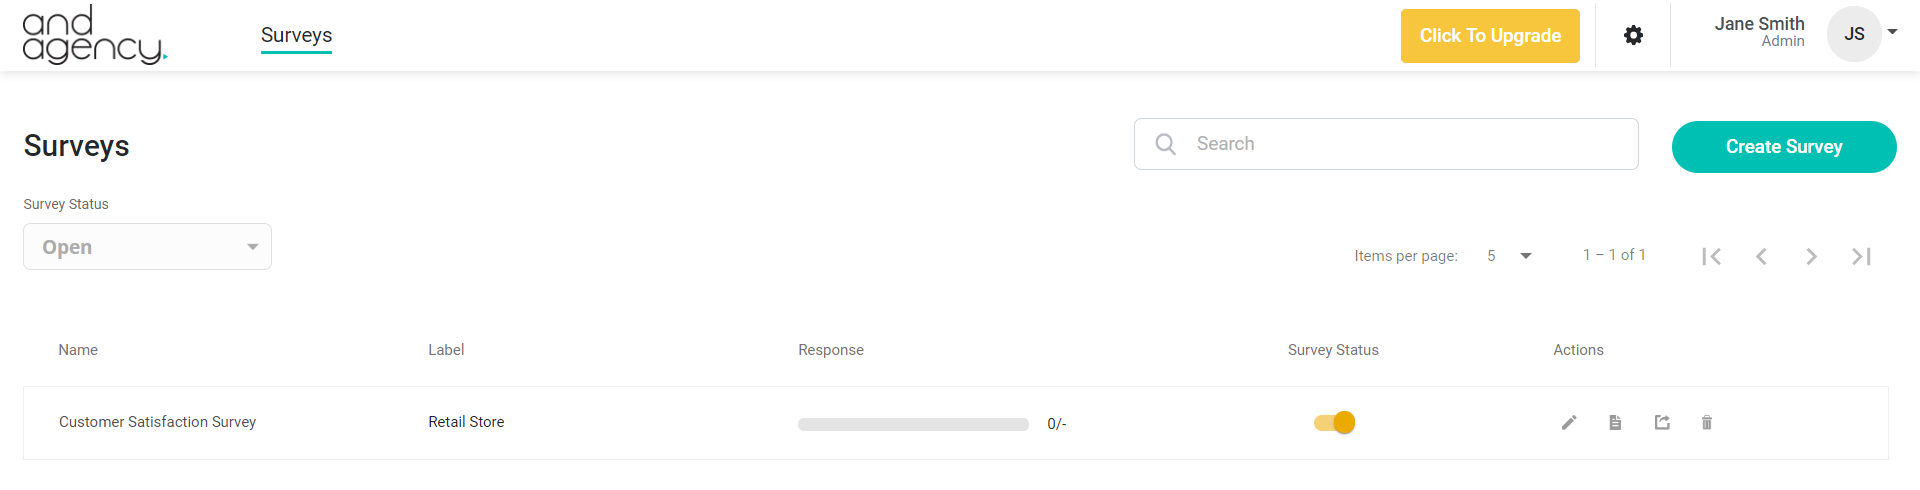
Search: Quickly search for your survey using the dynamic search field; it will list your surveys based on the Name and Labels you have given your survey.
Create Survey: Begin building a new survey by clicking Create Survey.
Survey Status Filter: Filter your survey list between Open and Closed surveys.
Name: Clicking the Name of your survey will take you to the Design section of that survey.
Labels: When creating a survey, you can assign a Label for quick identification of your survey.
Response: The Response progress bar is a quick indication of the total number of surveys you have obtained compared to your specified target quota. Surveys without a quota will show a dash “-“.
Survey Status Toggle: You can quickly toggle a survey on and off. It is important to note if you turn a survey off, respondents will not be able to take your survey.
Actions – Edit: Clicking the Edit icon of your survey will take you to the Design section of that survey.
Actions – Survey Overview: Clicking the Survey Overview icon will display a detailed progress and performance table of the survey.
Actions – Export: Clicking the Export icon will immediately download all survey data for the survey.
Actions – Delete: Clicking the Delete icon will erase the entire survey, this action cannot be undone.
Survey Overview
The Survey Overview is a pop-up that provides you with a breakdown of the survey’s performance.
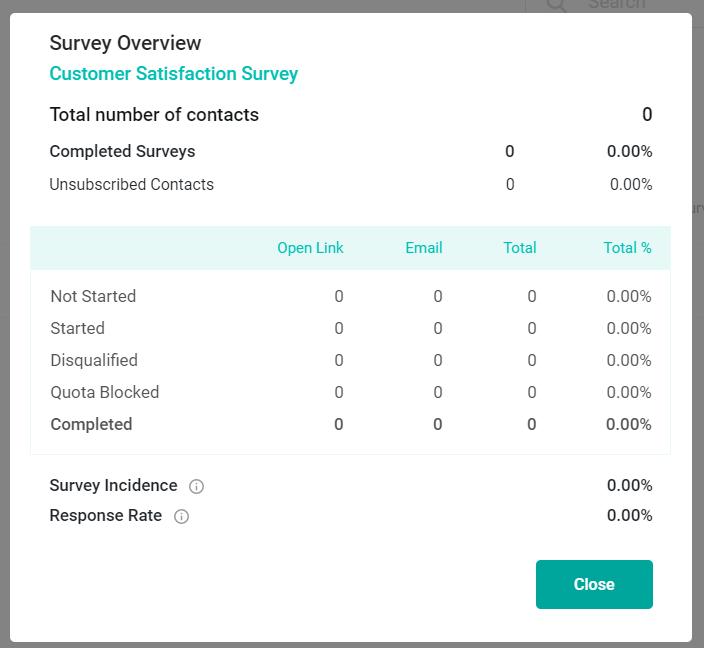
Total Contacts: The total count of all contacts who have been emailed a survey, including the count of those who have started an Open Link survey.
Completed Surveys: The total number of completed surveys from all channels.
Unsubscribe: The total number of respondents that have requested to be unsubscribed from further emails surveys.
Not Started: The number of respondents who have not started the survey you have emailed them. Open Link surveys will not have a count of surveys not started.
Started: The number of surveys that respondents have started across channels but have not finished.
Disqualified: The number of surveys excluded from the total number of completed surveys because the respondent did not fully complete the survey.
Quota Blocked: The number of surveys blocked due to reaching your desired quota.
Survey Incidence: The number of completed surveys of those who started the survey.
Response Rate: The number of respondents who started the survey divided by those who were invited.
SETTINGS
Create Survey
To begin building your survey click Create Survey from the Survey page, fill in the details when prompted and click Create to begin designing your survey.
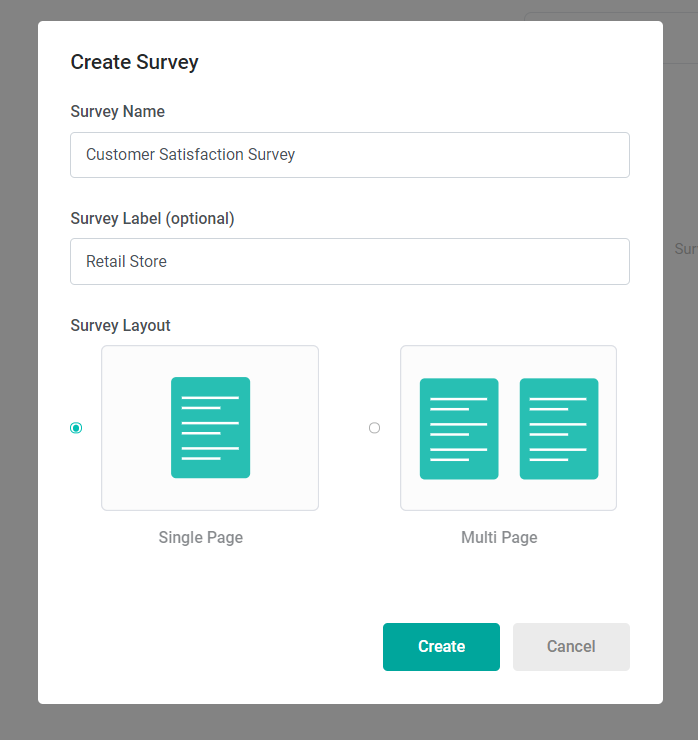
Survey Name: Select a meaningful survey name for your survey.
Survey Label: An optional label can be added to your survey. This will allow for you to quickly find it, if needed.
Survey Layout – Single Page: In a Single Page survey, all your questions are on one page. With this layout, certain options are not available, such as a skip logic, progress bar and back button.
Survey layout – Multi Page: In a Multi-Page survey, your questions are displayed on more than one page. With this layout, the respondent will page forward to proceed through the questions.
Settings
In the General section of the Survey Settings, you can begin applying themes and configurations that will apply to the entire survey.
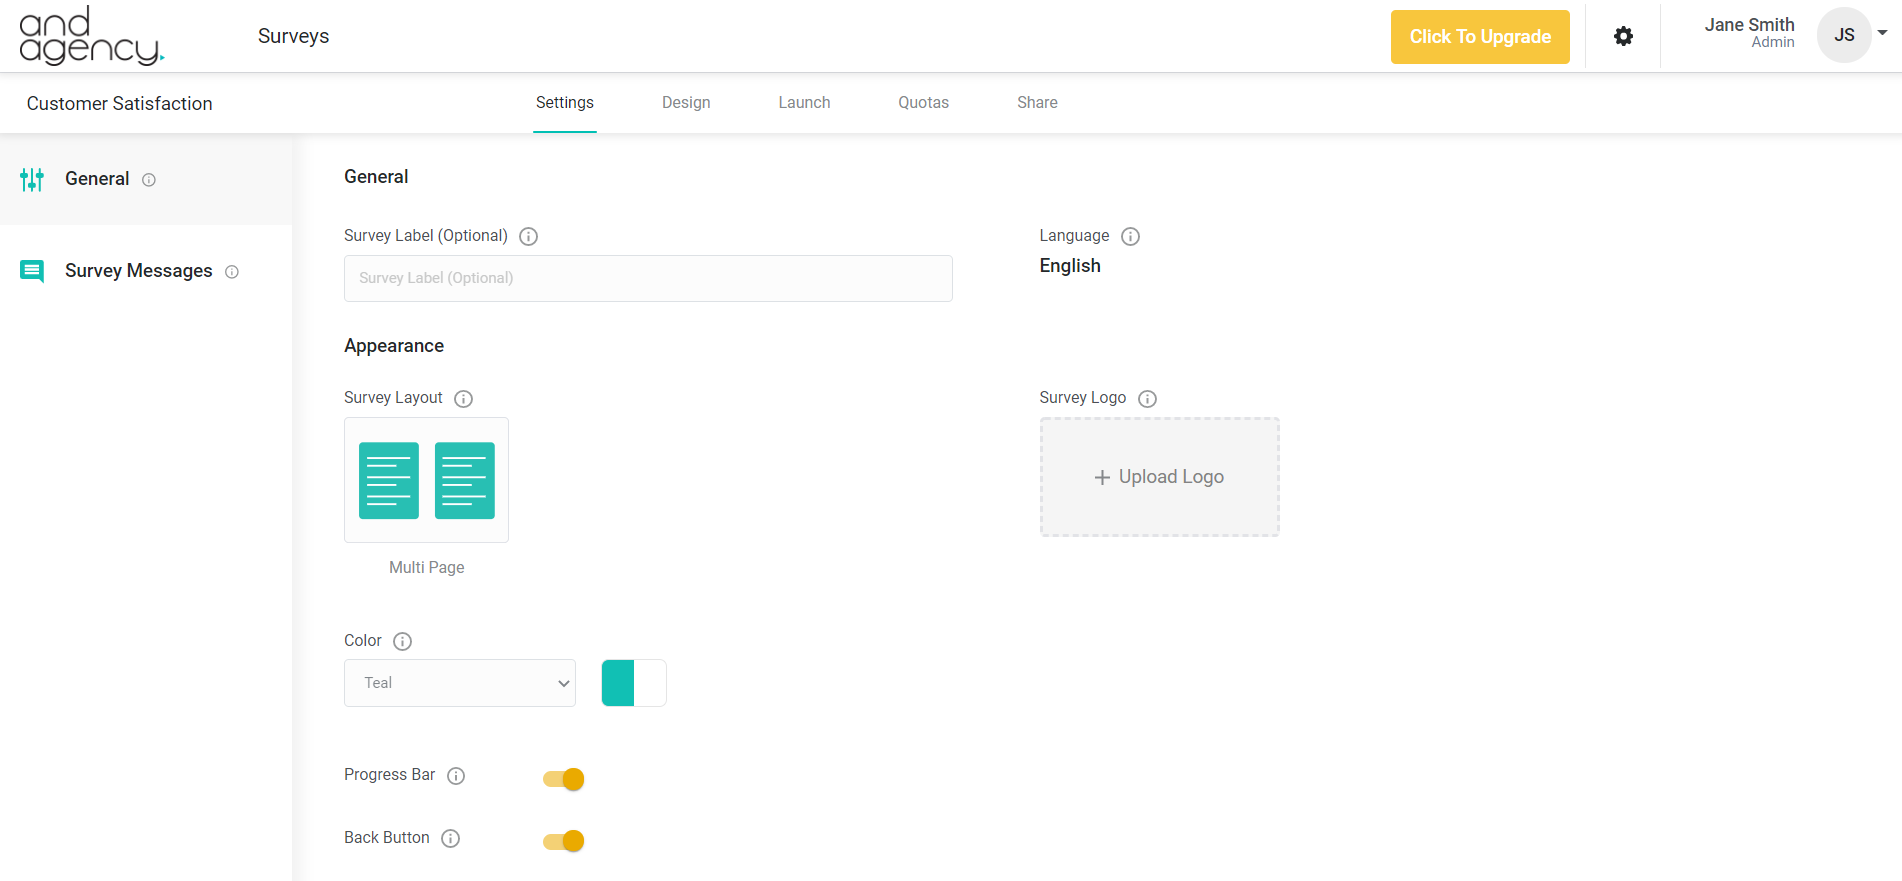
Survey Logo: Upload a logo which will be used in the survey and invite.
Color: Select from a series of color palates and apply them to the survey.
Progress Bar: Toggle the survey progress bar on/off; the progress bar is an indicator for respondents of how much of the survey has been completed.
Back Button: Enable/disable your survey’s back button to prevent respondents from paging backwards in the survey.
In the Survey Messages section, you can the customize messages that appear throughout your survey for the following reasons:
DESIGN
Add Questions
Begin building your survey by clicking Add Question.
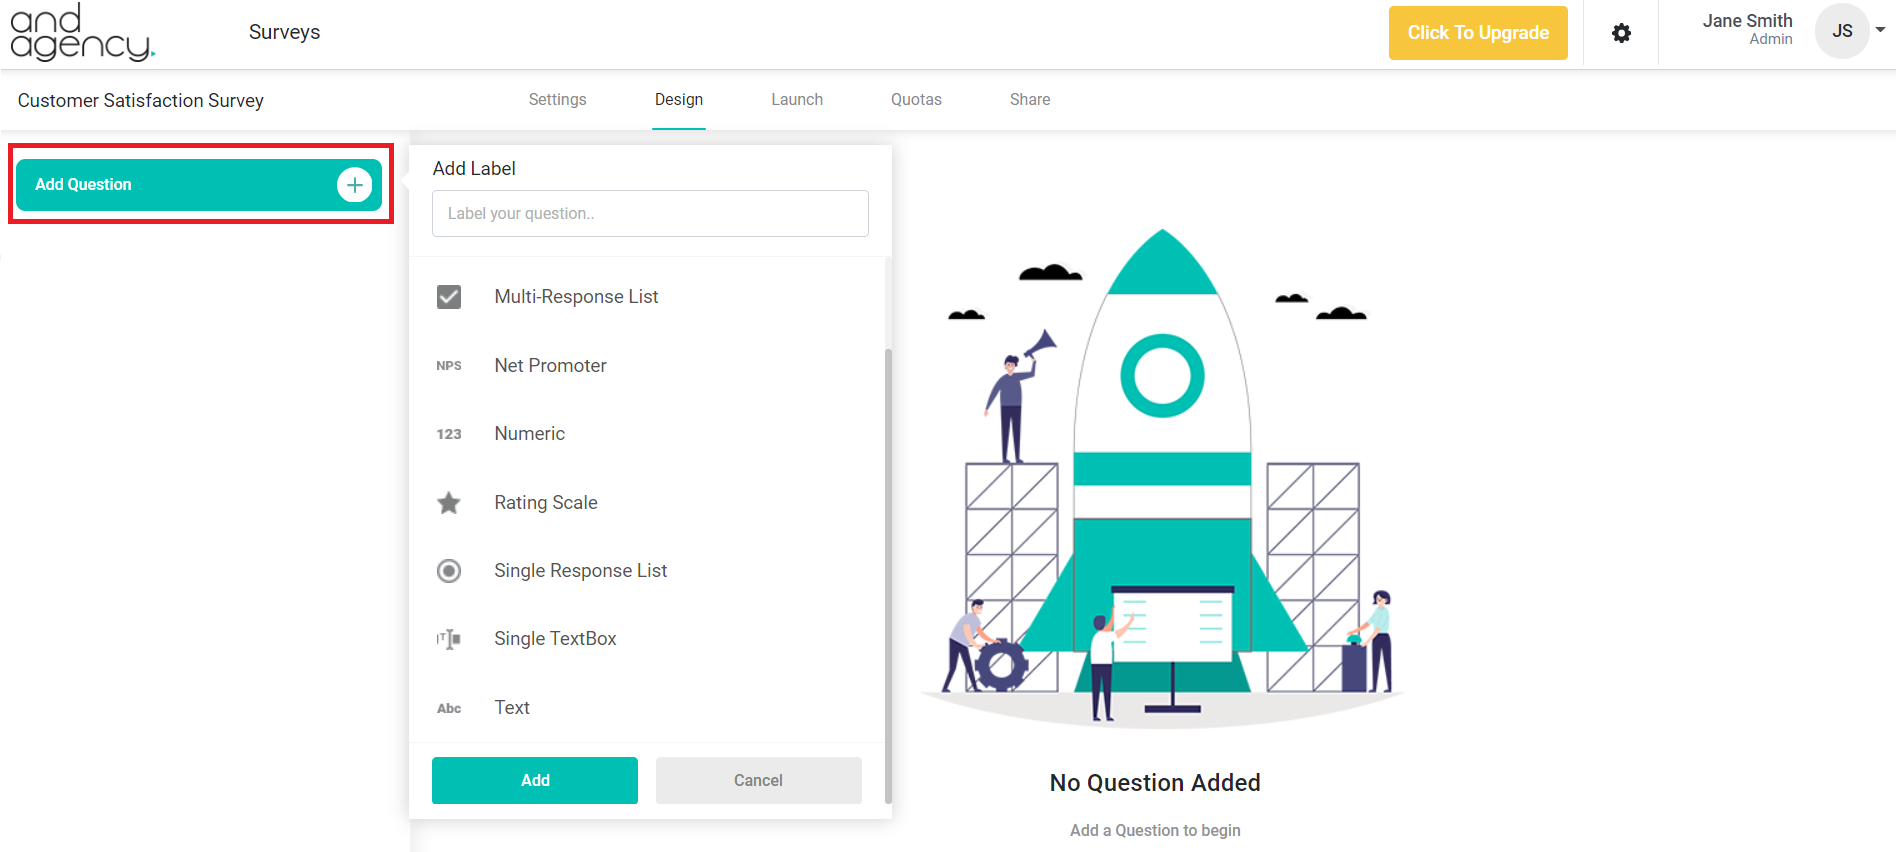
Each question requires a Label, this will be the name of the field in your data exports. Select from a variety of questions and click Add to place this question in your survey.
Question Design
For each question in your survey, you will be required to type it in through the Text Editor. With the Text Editor, you can customize the font, formatting and alignment.
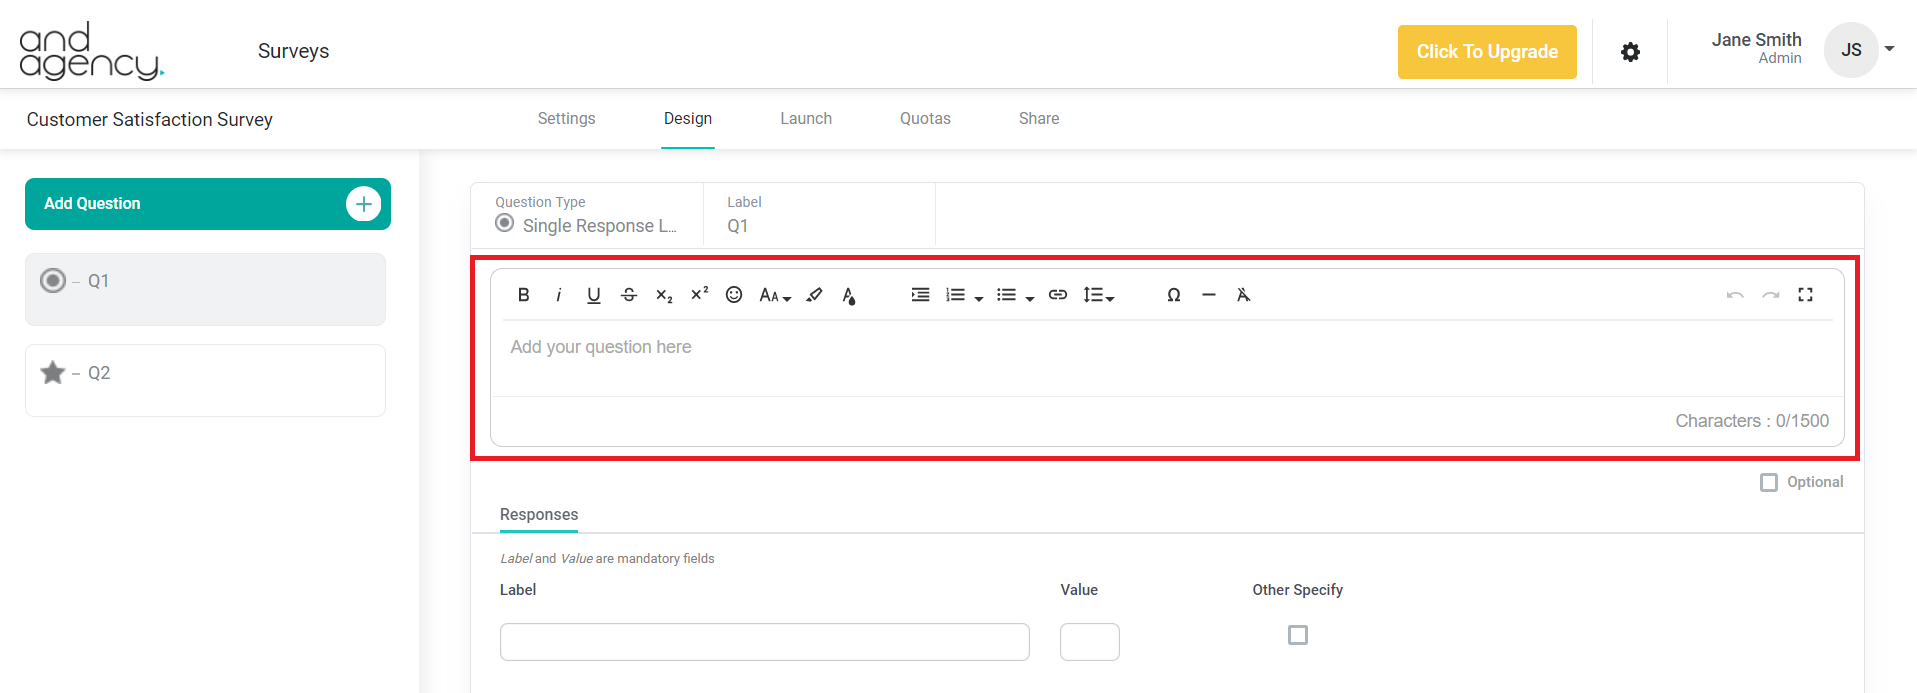
You can flag a question as Optional; this will allow respondents to skip the question by proceeding without providing a response.
Question Types
You have a variety of question types to select from as you design your survey. Each question has various response configurations specific to it.
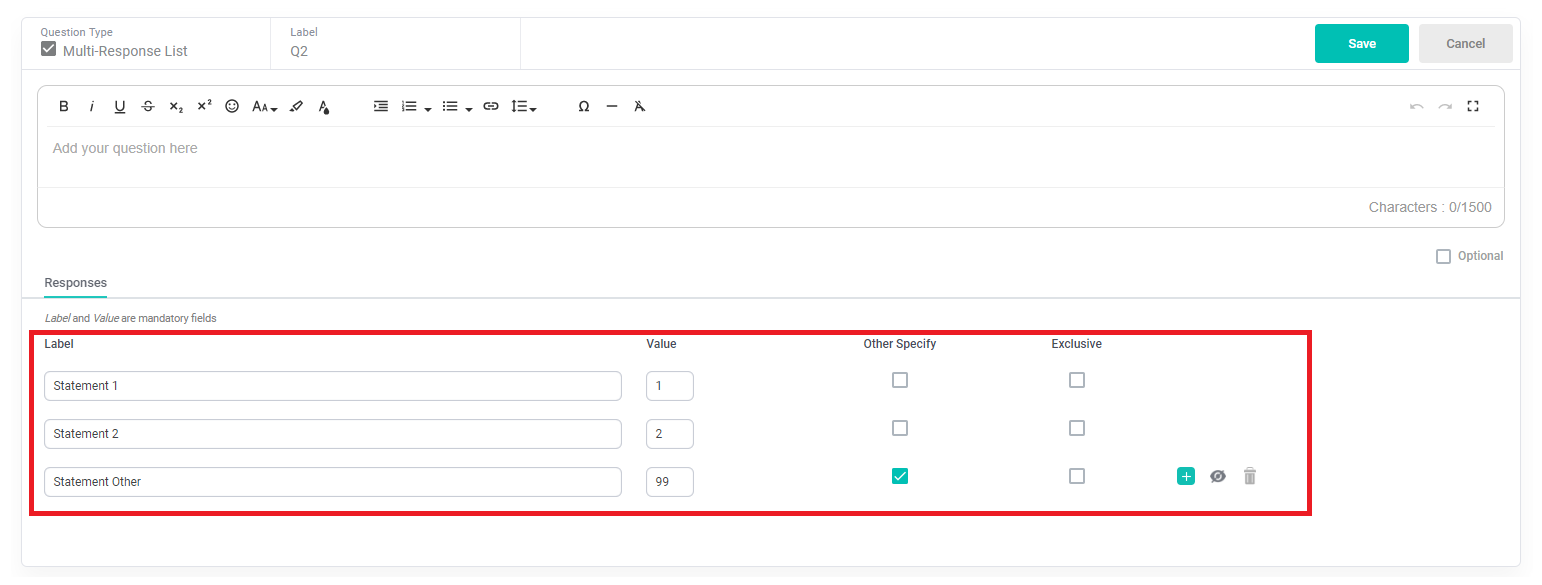
The Multi-Response List and Single-Response List requires you to input your Label statement and a numeric Value to be used in reporting. Additionally, a Label can be flagged as Exclusive or Other. Specify which will allow the user to provide open text as part of their response to the label.
You can Add, Hide, or Delete statements through the quick action icon that appear when you hover over each statement.
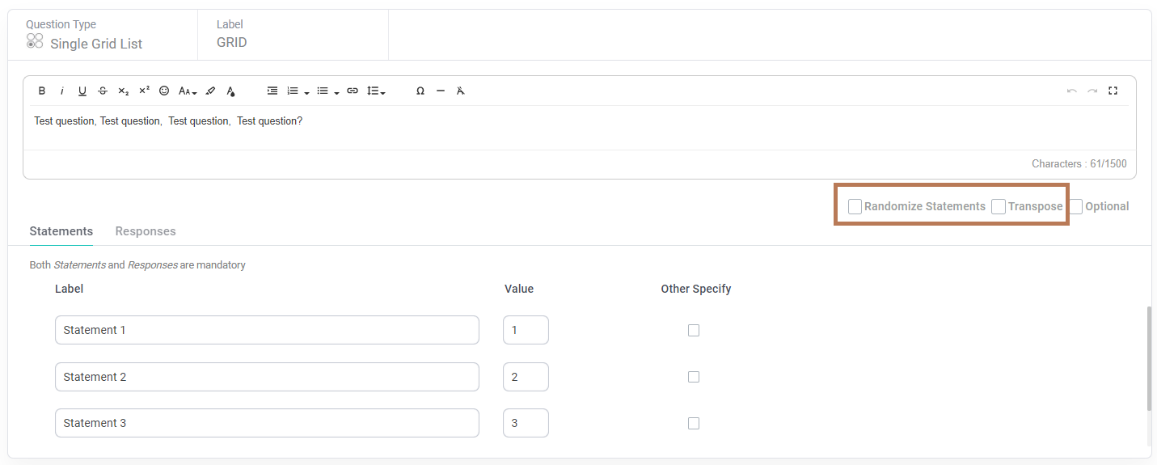
The Single Grid List requires you to input a Label and Value for each Statement and Responses. Statements can be Randomized by checking the corresponding box. Or, you can Transpose the Statements and Responses for a different survey experience.
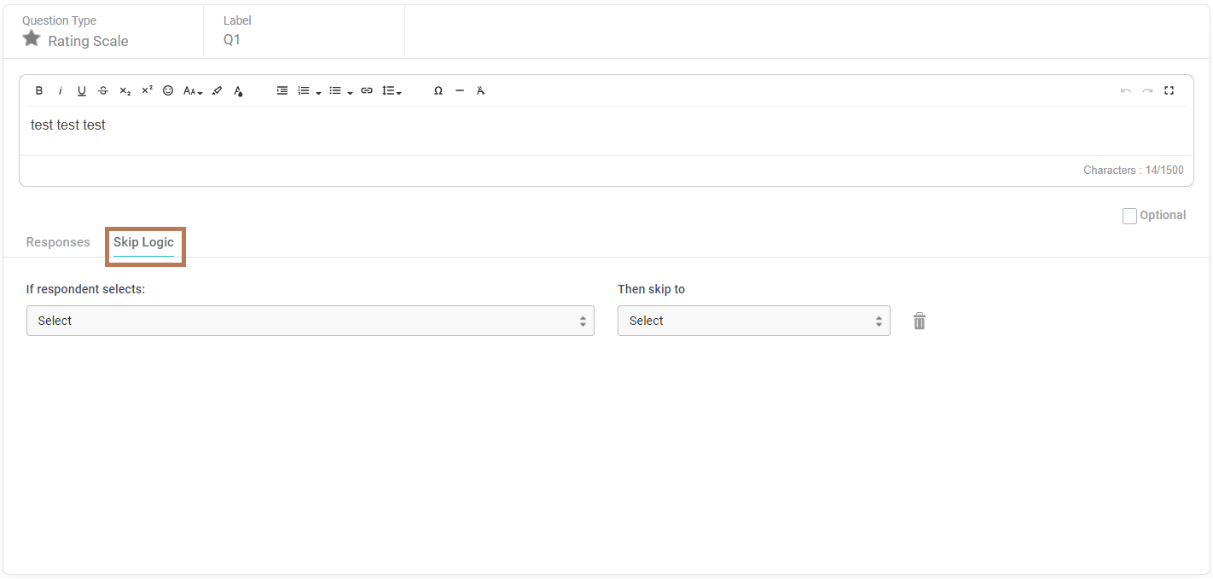
Skip Logic can be applied to appliable questions, allowing for different survey paths for the respondent. Where available, a Skip Logic tab is available for selection in the question design section. Simply, select the response outcome(s) and the question to skip too.
LAUNCH
Preview
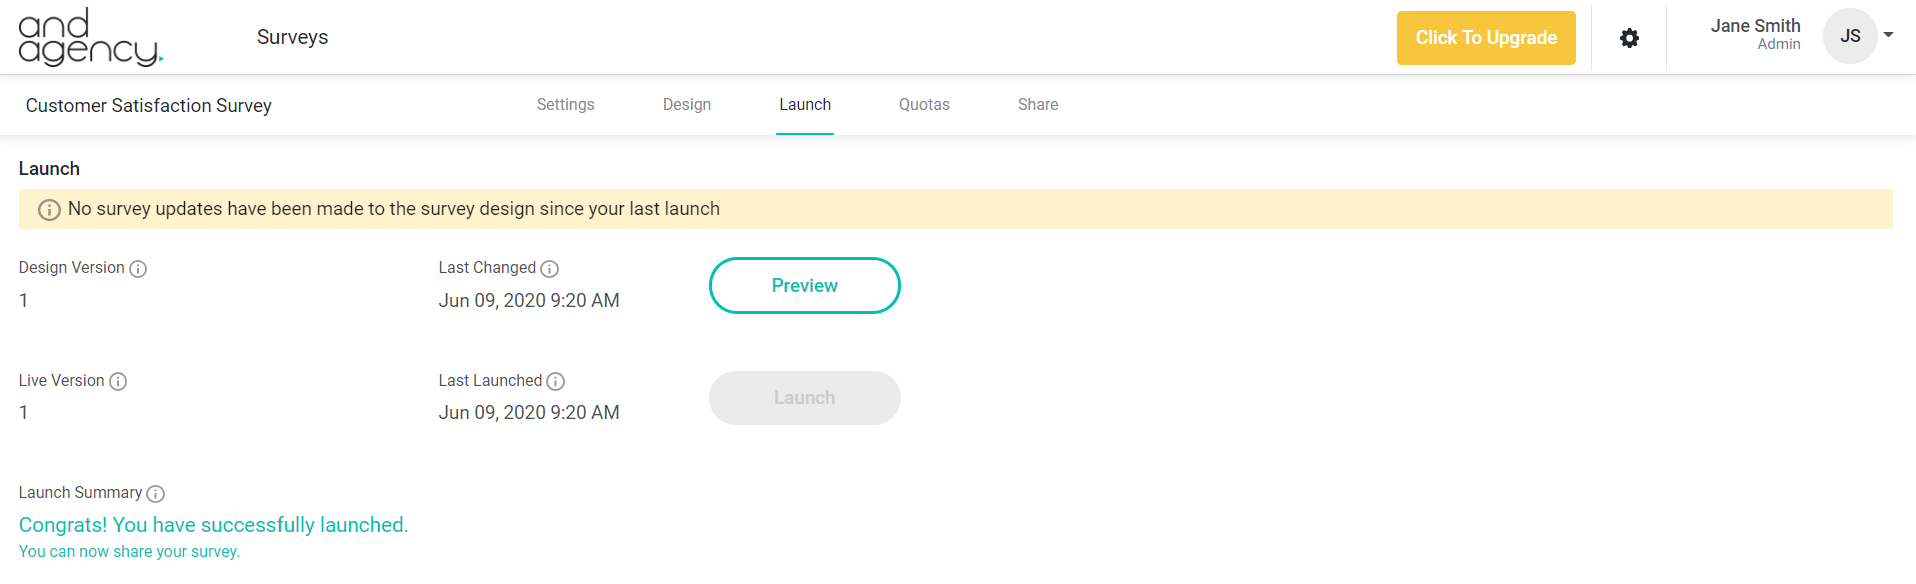
Before you launch your survey, you can Preview it. The preview will be based on the latest updates you saved to your survey. From the Launch page, you will see the current saved and/or launched version and last changed date & time.

Launch
Clicking Launch will make all your saved survey changes live. Respondents can receive survey links and those who already have links will be able to access the updated changes to the survey when they refresh the link. Once launched, you will receive a Launch Summary confirming success or identifying any errors in your survey.
QUOTAS
Once launched, you will be able to set the Limit of the number of surveys you would like to achieve on the Quotas page. As surveys are completed, the Count of surveys will increase. After achieving your desired number of surveys, respondents will no longer be able to take it.

SHARE
Channel Types
There are two channels or collection methods available. If you wish to explore additional collection methods, please contact support@andsurvey.com.

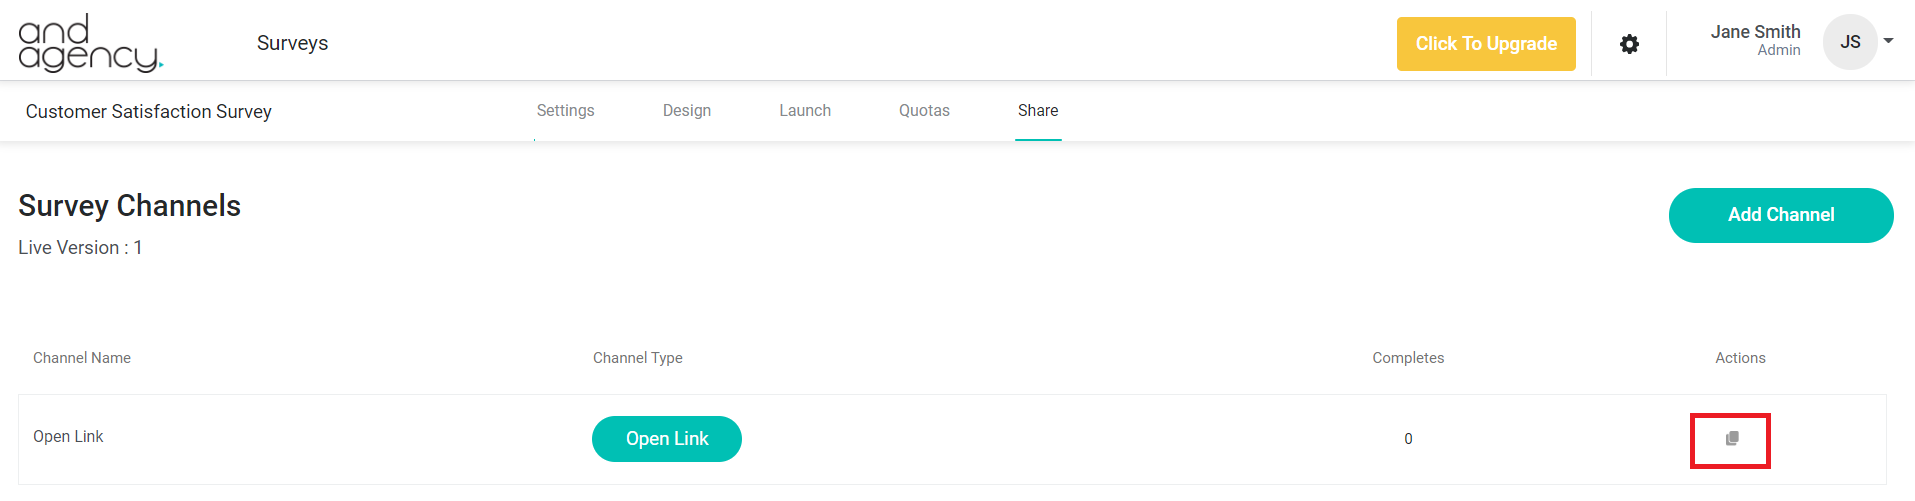
Open Link
Access your Open Link URL by clicking the Copy icon under Actions. You can deliver this URL to your respondent.
After adding an Email channel, you will be directed to the Email contact and invite design page. You can also select the Edit icon under Actions.

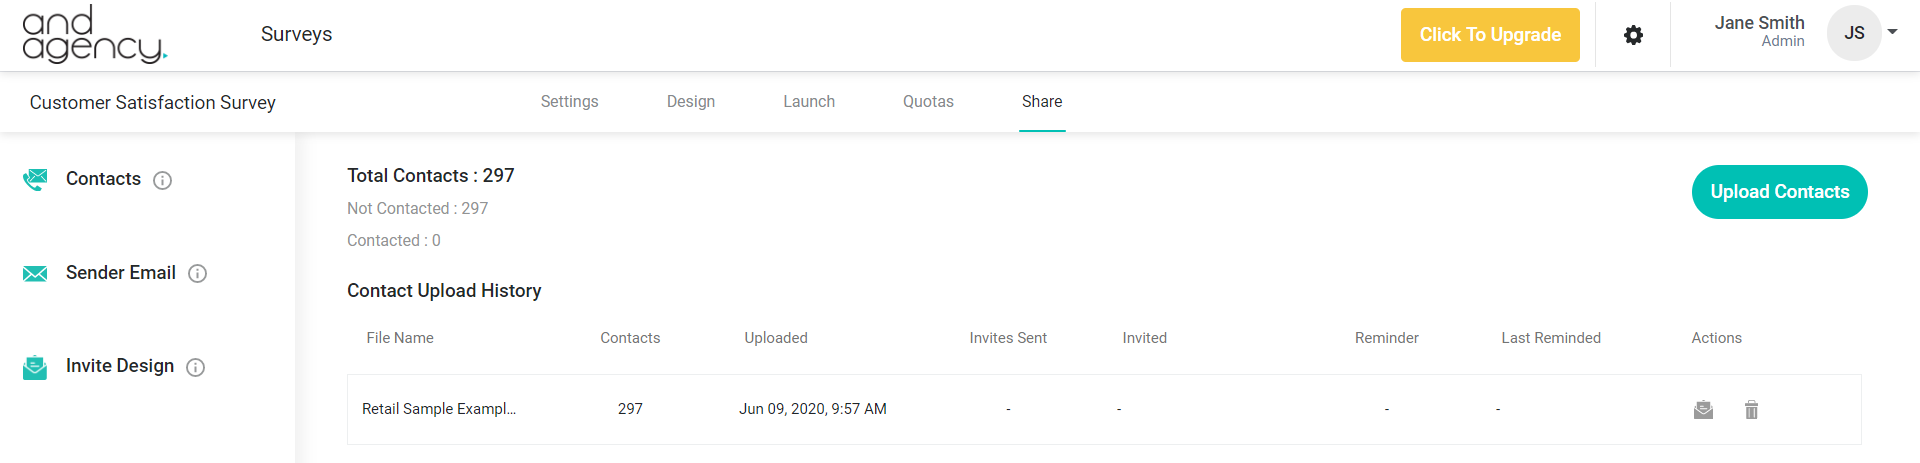
Contacts
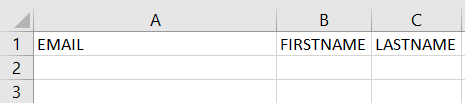
The contact list of respondents, or sample list, is uploaded by clicking Upload Contacts. From the Actions icon, email invites and reminders can be sent. Your sample file can be Deleted.

To upload a contact list, your list must be correctly formatted in Excel (.xlsx) with the following header fields (case insensitive):
When uploading, your contact list will be validated for correct structure and content. Any issues identified will be available in the error popup with details of issues viewable in an Excel download.
Sending Invites and Reminders
To send Invites and Reminders, use the Send icon under Actions.
When sending emails, the system will automatically remove contacts from your list who have unsubscribed or who are blocked due to meeting quota limits.
Reminders will be enabled 24 hours after the invite has been sent.
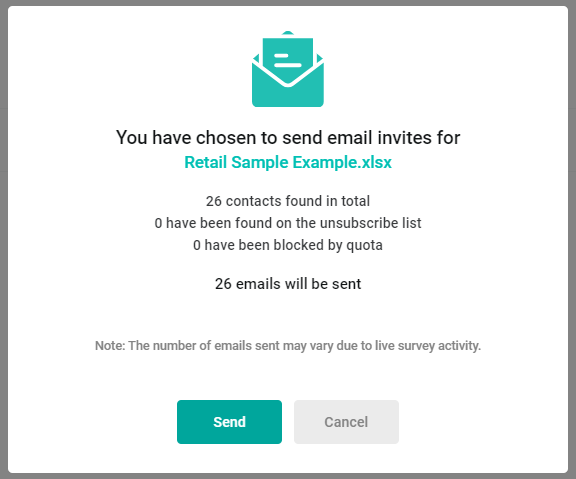
Emails sent will be monitored for bounce back emails by the system. If your contact list results in excessive bounce back, you will be notified. Repeated and excessive bounce backs may result in in the survey being locked.
After sending Invites and Reminders, you will be able to click the Contact Summary icon under Actions, to view the detailed progress of each contact list file uploaded.
Sender Email
Before you can send email invites, you will need to verify the Sender Email address. Emails are sent via a ANDsurveyuser.com ‘from’ a valid and confirmed email address you own.
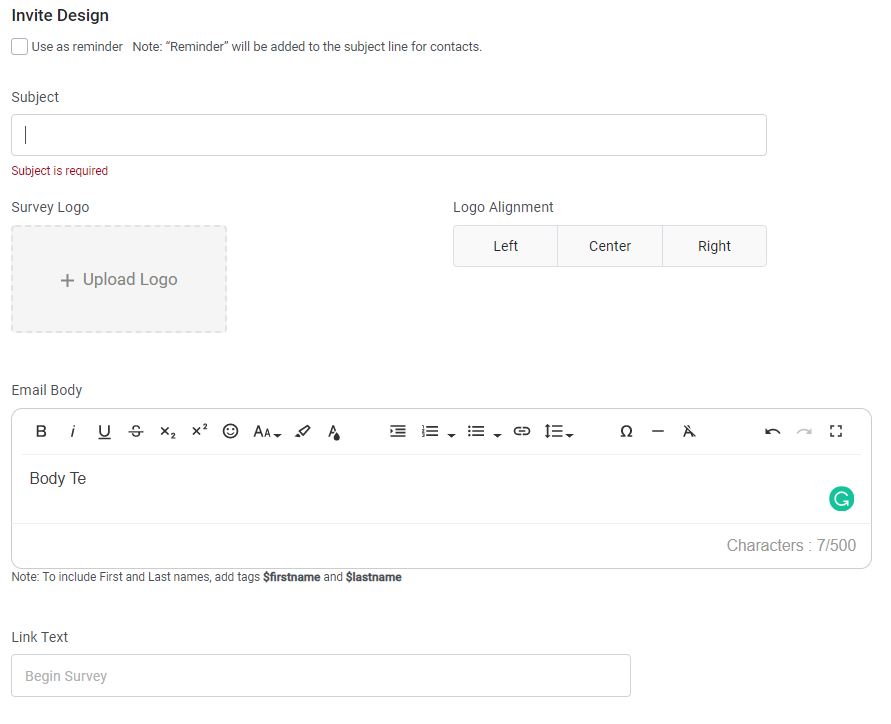
Invite Design
Before emails can be sent, you will need to design the invite on the Invite Design page. You will need to specify:
Once you have designed your invites, the Send Test Email option will appear, allowing you to validate the look and feel of your invite.
Note: To include First and Last names, add tags $firstname and $lastname to the body of the email.
Unsubscribe
A Unsubscribe option is added to the footer all email invites. Respondents have the option to opt-out of receiving further email invites from you.
Users that have unsubscribed can be found when exporting your data. Or, the Unsubscribe List can be exported at the account level found on the Account Settings page.

Email Deliverability Protection
Email deliverability is a critical component of a successful email survey campaign. It is your responsibility to ensure your email contact lists are accurate and the content of your emails are not flagged as spam.
To maintain high reputation statuses with Internet Service Providers, automated email protection is applied to all email surveys:
Email Deliverability Protection is put in place to ensure high ISP reputations are maintained and emails can be delivered. Contact support@andsurvey.com for support on developing high quality email survey campaigns.
Responses
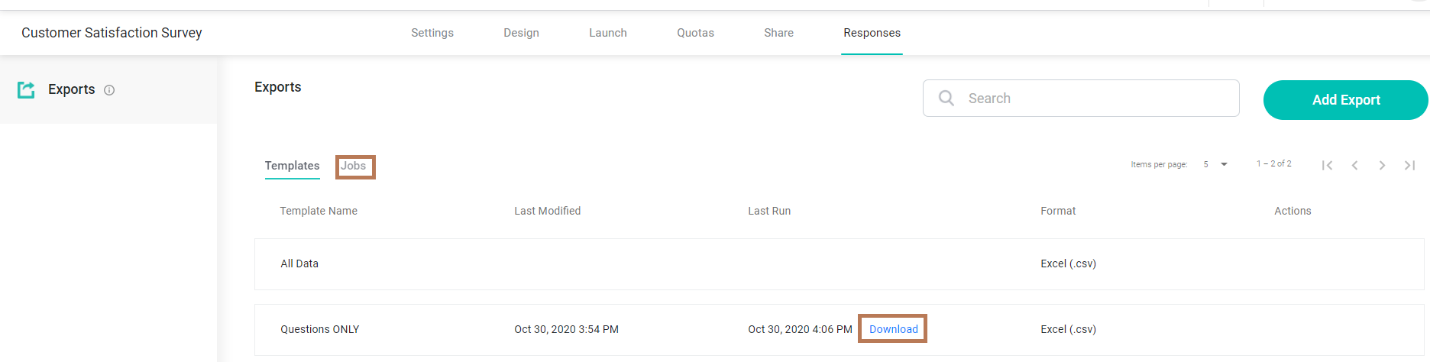
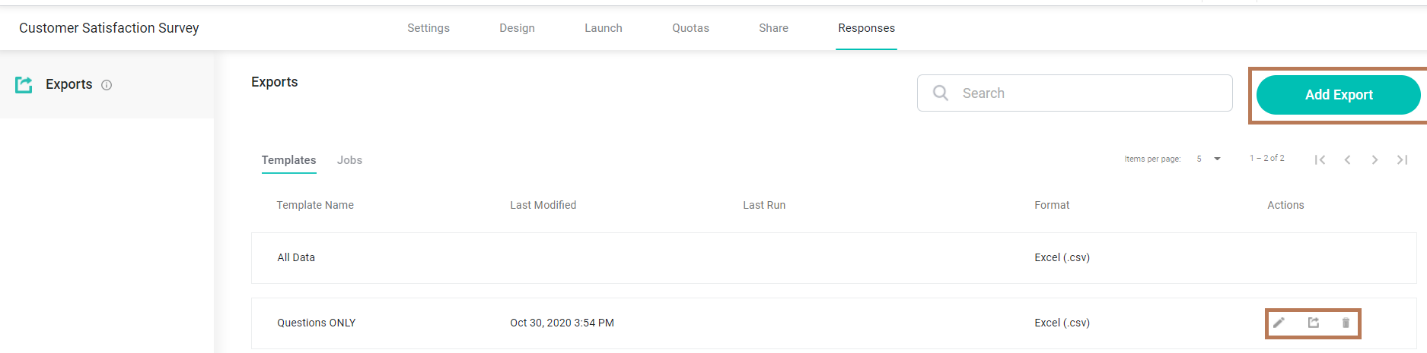
Exports
You can create custom Exports for one-time use or save them as templates for future use.
Select Add Export to create a new template. Or use the quick action icons to Edit, Run, or Delete existing export templates.
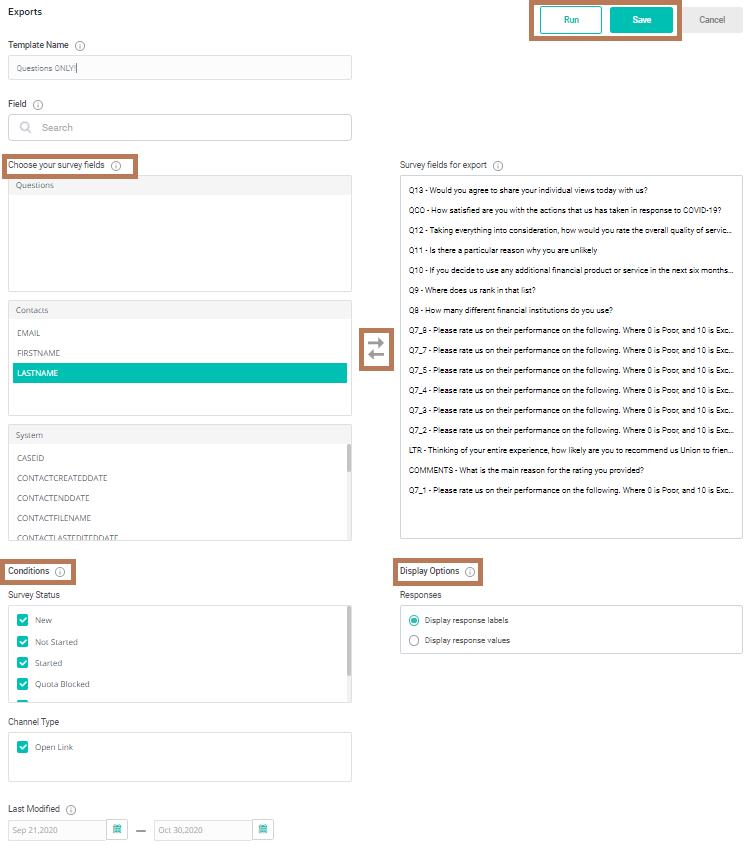
Add Export
You can create an export to Run one-time or Save as a template. Design your template by selecting your survey fields; Questions, Contacts, or System. Use the directional arrows to identify which fields you would like included or removed from the export.
Conditions can be set based on the Survey Status, Channel Type or the date the survey was Last Modified. Additionally, you can choose to export the response Labels or Values you previously identified in the Design section.
Once you Run an export, it will be available for Download under the Last Run column in the export listing. Or, previous exports can be found under the Jobs section (Note: Exports will be deleted after 15 days).